To set up the camera in your trailer--
1. Use the clamping base to mount the camera. The clamping
base can be clamped on any pole or board which is less than
2 ¥ in diameter or thick. Choose the mounting spot and tighten
the clip bolt on the clamping base.
2. Loosen the tilt lock knob, adjust the camera , point it in the
direction where you wish to monitor, and tighten the tilt lock knob.
3. Insert a 9V battery. Turn the On/Off switch to the ON setting.
The camera is set!
To set up the monitor in your pulling vehicles--
1. Mount the goose-neck suction mount to the windshield,
dashboard, or window.
2. Attach the monitor to the goose-neck suction mount.
3. Attach the antenna connector to the monitor.
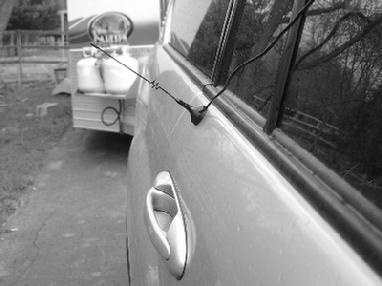
4. Open the car door and mount the booster antenna (magnet base)
on the side of your vehicle. Run the wire between the antenna
and the monitor through the car door and the car frame,
not through the car window and door frame.
5. Plug the power jack into the monitor, and then plug the 12V car
lighter adapter into the lighter jack.
6. Turn the monitor on.
7. Adjust the position of the monitor, the antenna wire, and the
power wire to avoid interference with the driver.
Best Result tips
For best performance, please consider these few guidelines:
The distance between the monitor and camera
-- Straight line, clear view, no obstacles in between, up to 300 feet.
-- When the camera is in the trailer, and the signal needs to go through
layers of metal and is not in a direct line with the monitors antenna,
up to 60 feet.
To insure good performance from your Trailer Eyes, please clamp the camera right
next to an opened window. Usually, there are a few bars by the window. Place a piece
of wood between the bar and window, an then clamp the camera on the wood. You should
have a good picture right away.
A fresh, strong 9V battery to provide adequate power to
transmit the signal.
A single alkaline 9V battery can operate the camera
up to 5 hours during the day or 3 hours in night vision mode.
Once you know where you would like to clamp your camera, please hard wire
the 12V trailer light power adapter to your trailer's lighting system. Afterward,
you won't need to worry about changing the battery anymore.
The booster antenna is very important. It is the most common
cause of a lack of image or a distorted image. The best place to mount
the antenna depends on the type of vehicle:
SUV: Please mount it on the strip of metal that makes up the window
frame on the driver or passenger side (on the same side the camera
is mounted). Put it on the second row passenger side, or possibly
further back. If this is not available, please mount the antenna on the
outside of the car above the door handle on the same side the camera
is mounted. Mount the booster antenna on the same side of
the vehicle where the camera is mounted.
Pickup Truck: Please mount it on the outside of the cargo bed, near the
back, on the same side the camera is mounted
DO NOT MOUNT THE ANTENNA ON THE ROOF.